
Wenn es darum geht, in Photoshop eine Auswahl zu treffen, gibt es zwei Arten von Menschen - diejenigen, die wissen, wie man das Stiftwerkzeug verwendet, und diejenigen, die Schwierigkeiten haben. Die meisten Leute hören auf, so lange wie möglich mit dem Stiftwerkzeug umzugehen, während andere es nie lernen, weil sie glauben, es sei einfach zu verwirrend, zu kompliziert und einfach unnatürlich.
Letztendlich leidet ihre Arbeit in Photoshop darunter, da sie sich bei fast allem, was sie mit den rechteckigen oder elliptischen Auswahlwerkzeugen nicht auswählen können, nicht auf das Lasso-Werkzeug verlassen können. In diesem Tutorial zu Adobe Photoshop werden wir dem Leiden ein Ende setzen. Wir werden lernen, wie einfach es ist, mit dem Stift-Werkzeug eine Auswahl zu treffen.
Wenn ich jetzt "easy" sage, heißt das nicht, dass Sie dieses Tutorial lesen und sich sofort in einen Pen Master verwandeln. Das Erlernen der Verwendung des Stiftwerkzeugs ähnelt dem Erlernen des Fahrradfahrens. Sobald Sie gelernt haben, wird es ganz natürlich erscheinen und Sie werden sich fragen, wie jemand möglicherweise nicht wissen kann, wie man etwas so Einfaches benutzt. Um an diesen Punkt zu gelangen, ist jedoch ein wenig Übung und Anstrengung erforderlich. Wenn Sie in jedem Buch lesen, in dem es darum geht, wie man Fahrrad fährt, lernen Sie möglicherweise die Grundlagen der Funktionsweise von Pedalen, Gängen und Bremsen um das Gleichgewicht zu halten, dass das eigentliche Lernen beginnt.
Eines der großartigen Dinge am Stift-Werkzeug ist, dass es nicht exklusiv für Photoshop ist. Weit davon entfernt! Praktisch jedes gängige Bildbearbeitungs-, Grafik- und Seitenlayoutprogramm verwendet das Stift-Tool in der einen oder anderen Form. Wenn Sie also erst einmal gelernt haben, wie man es in Photoshop verwendet, haben Sie bereits ein gutes Verständnis für die Verwendung in vielen andere Programme auch!
Wo finde ich das Stiftwerkzeug?
Bevor wir darüber sprechen, was das Stiftwerkzeug ist oder wie es verwendet wird, sollten wir uns zuerst ansehen, wo es in Photoshop zu finden ist. Sie finden das Stift-Werkzeug in der Werkzeugpalette, gruppiert in die Werkzeuge Form-Werkzeug, Typ-Werkzeug und Pfadauswahl (weißer Pfeil) und Direktauswahl (schwarzer Pfeil) (siehe Abbildung links).
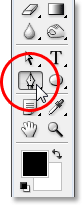
Photoshop-Stiftwerkzeug
Dies kann natürlich die Frage aufwerfen, warum, wenn wir mit dem Stiftwerkzeug eine Auswahl treffen können, diese nicht mit den anderen Auswahlwerkzeugen (dem Rechteckigen Auswahlwerkzeug, dem Elliptischen Auswahlwerkzeug, dem Lasso-Werkzeug usw.) unter gruppiert ist ganz oben auf der Tools-Palette? Warum ist es dort unten mit diesen anderen Werkzeugen, die eindeutig keine Auswahlwerkzeuge sind?
Das ist eine exzellente Frage, und es gibt auch eine ebenso exzellente Antwort, auf die wir gleich noch eingehen werden.
Warum wird es das "Stift" -Tool genannt?
Einer der ersten Stolpersteine beim Erlernen der Verwendung des Stift-Werkzeugs, wie bei vielen anderen Dingen in Photoshop, ist der Name, denn wenn es eine Sache gibt, die jeder, der jemals versucht hat, zu verwenden, weiß, ist dies keine Stift. Zumindest nicht die Art von Stift, an die Sie normalerweise denken, wenn Sie das Wort "Stift" hören. Versuchen Sie, Ihren Namen so zu schreiben, wie Sie ihn mit einem Stift auf ein Blatt Papier schreiben könnten, und Sie werden wahrscheinlich mit einem verdrehten, durcheinandergebrachten Durcheinander und Dingen enden, die sich gegenseitig überlagern (das nehme ich natürlich an) könnte sehr gut sein, wie Sie Ihren Namen unterschreiben).
 Pierre Bezier
Wenn es sich also nicht wie ein herkömmlicher Tintenstift verhält, warum heißt es dann Pen Tool? Das Stift-Werkzeug wurde im Laufe der Jahre tatsächlich verschiedene Dinge genannt, und damit meine ich nicht die Art von Dingen, die Sie es in Momenten der Frustration genannt haben mögen. Vielleicht haben Sie schon gehört, dass es sich um den Bezier-Stift oder das Bezier-Werkzeug handelt, und das liegt daran, dass es von einem Mann namens Pierre Bezier (der er links ist), einem französischen Ingenieur und Allround-Schlauen, der sich das ausgedacht hat, geschaffen wurde ausgefallene Mathematik, die das Werkzeug antreibt, während es für die Renault-Autofirma arbeitet (das Stiftwerkzeug wurde ursprünglich entwickelt, um beim Entwerfen von Autos zu helfen).
Möglicherweise haben Sie auch das Stift-Werkzeug gehört, das als Pfad-Werkzeug bezeichnet wird, und das ist wirklich der am besten geeignete Name dafür. Mit dem Stift-Werkzeug können Sie "Pfade" zeichnen. Um mit dem Stiftwerkzeug eine Auswahl zu treffen, konvertieren wir einfach den oder die Pfade, die wir gezeichnet haben, in eine Auswahl. Es beginnt jedoch immer mit einem Pfad.
Plugin für Shortcodes, Aktionen und Filter: Fehler im Shortcode (ads-basics-middle-2)
Was ist ein Weg?
Ein "Pfad" ist, ganz ehrlich, etwas, das in einem Programm wie Photoshop möglicherweise etwas unangebracht wirkt. Der Grund dafür ist, dass Photoshop in erster Linie ein pixelbasiertes Programm ist. Es werden Millionen winziger quadratischer Pixel benötigt, die ein typisches digitales Bild ausmachen, und es werden Dinge damit gemacht. Pfade haben dagegen absolut nichts mit Pixeln zu tun, weshalb ich sagte, dass sie in einem Programm, das hauptsächlich zum Bearbeiten und Zeichnen von Pixeln verwendet wird, möglicherweise nicht an der richtigen Stelle zu sein scheinen.
Ein Pfad ist eigentlich nichts weiter als eine Linie, die von einem Punkt zum nächsten führt, eine Linie, die völlig unabhängig von den darunter liegenden Pixeln ist und sich nicht darum kümmert. Die Linie kann gerade oder gekrümmt sein, aber sie verläuft immer von einem Punkt zu einem anderen und hat, wie bereits erwähnt, überhaupt nichts mit den Pixeln im Bild zu tun. Ein Pfad ist vollständig vom Bild selbst getrennt. Tatsächlich ist ein Pfad so unterschiedlich, dass der Pfad auf dem Papier nicht angezeigt wird, wenn Sie versuchen, Ihr Bild mit einem auf Ihrem Bildschirm sichtbaren Pfad zu drucken. Wenn Sie Ihr Bild als JPEG.webp-Datei gespeichert und auf eine Website hochgeladen haben, wird es auch dann nicht im Bild auf der Website angezeigt, wenn Sie das Bild mit dem auf dem Bildschirm in Photoshop angezeigten Pfad gespeichert haben. Die Pfade sind nur für Ihre Augen und für Photoshop bestimmt. Niemand anderes wird sie jemals sehen, es sei denn, sie laufen während der Arbeit an Ihrem Computer vorbei.
Wir brauchen immer mindestens zwei Punkte, um einen Pfad zu erstellen, da wir wissen müssen, wo der Pfad beginnt und wo er endet. Wenn wir genügend Punkte verwenden, um unseren Pfad zu dem Punkt zurückzubringen, an dem er begonnen hat, können wir aus Pfaden verschiedene Formen erstellen. Genau so funktionieren die verschiedenen Formwerkzeuge von Photoshop. Das Rechteck-Werkzeug verwendet Pfade, die durch Punkte verbunden sind, um eine rechteckige Form zu zeichnen. Das Ellipse-Werkzeug verwendet Pfade, die durch Punkte verbunden sind, um eine elliptische Form zu zeichnen und so weiter. So funktioniert auch das Typ-Werkzeug von Photoshop, obwohl Photoshop die Texte ein wenig anders behandelt als normale Formen, aber alle Texte in Photoshop im Wesentlichen aus Pfaden bestehen. Tatsächlich können Sie Text in Formen umwandeln, wodurch Sie die gleichen Optionen zum Bearbeiten von Pfaden wie beim Arbeiten mit Formen erhalten.
Möglicherweise haben Sie auch Pfade gehört, die als Umrisse bezeichnet werden, und das ist eine ziemlich gute Beschreibung dessen, was ein Pfad ist oder zumindest was ein Pfad sein kann. Wir können einen quadratischen Pfad zeichnen, und wenn wir nichts anderes damit tun, als ihn nicht mit einer Farbe zu füllen oder ihm einen Strich zuzuweisen, dann haben wir nur einen Grundriss eines Quadrats. Das Gleiche gilt für einen Kreis oder eine andere Form, die wir zeichnen. Der Pfad selbst ist nur der Umriss der Form. Erst wenn wir etwas mit dem Pfad tun, wie ihn füllen, einen Strich anwenden oder ihn in eine Auswahl umwandeln, wird der Pfad tatsächlich zu etwas mehr als einer Grundskizze.
Sie können einen gesamten Pfad mit dem Pfadauswahl-Werkzeug (auch als "schwarzer Pfeil" bekannt) auswählen, oder Sie können einzelne Punkte oder Pfadsegmente mit dem Direktauswahl-Werkzeug (dem "weißen Pfeil" -Werkzeug) auswählen. Ein Pfad "Segment" oder "Liniensegment", wie es manchmal genannt wird, ist ein Pfad zwischen zwei Punkten. Ein rechteckiger Pfad besteht beispielsweise aus vier Punkten (einer in jeder Ecke), und die einzelnen Pfade, die die Punkte oben, unten, links und rechts miteinander verbinden, um die Form des Rechtecks zu erstellen, sind die Pfadsegmente . Der tatsächliche Pfad selbst ist die Kombination aller einzelnen Pfadsegmente, aus denen die Form besteht.
Das kann etwas verwirrend sein, also mal sehen, was ich meine. Öffnen Sie ein neues Dokument in Photoshop. Es spielt keine Rolle, welche Größe es ist. Ich werde die Größe 640x480 aus der Liste der Voreinstellungen auswählen, aber wie gesagt, es spielt keine Rolle, welche Größe Sie auswählen. Wählen Sie Ihr Stiftwerkzeug aus der Werkzeugpalette aus. Sie können das Stiftwerkzeug auch einfach durch Drücken des Buchstabens P auf Ihrer Tastatur auswählen.
Die zwei Stiftwerkzeugmodi
Bevor wir fortfahren, müssen wir zunächst sicherstellen, dass wir mit Pfaden arbeiten. Dies liegt daran, dass das Stift-Tool über zwei verschiedene Modi verfügt, in denen es arbeiten kann, und standardmäßig den anderen verwendet. Wenn Sie das Stift-Werkzeug ausgewählt haben und in der Optionsleiste oben auf dem Bildschirm nachsehen, sehen Sie eine Gruppe von drei Symbolen:

In der Optionsleiste in Photoshop wird die Gruppe von drei Symbolen angezeigt, die die drei Modi des Stiftwerkzeugs darstellen.
Ich weiß, dass es zwei Modi gibt, in denen das Stift-Werkzeug arbeiten kann. Um die Sache noch verwirrender zu machen, gibt es drei Symbole. Das rechte Symbol, das Füllpixel-Symbol, ist jedoch ausgegraut und steht bei der Arbeit nicht zur Verfügung mit dem Stiftwerkzeug. Es ist nur verfügbar, wenn Sie mit den verschiedenen Formwerkzeugen arbeiten. Wir müssen also nur zwei Symbole betrachten.
Das Symbol auf der linken Seite ist das Symbol für Formebenen, das auch als "nicht das gewünschte" Symbol bezeichnet wird und standardmäßig ausgewählt ist. Wenn wir mit dem Stiftwerkzeug arbeiten und dieses Symbol auswählen, zeichnen wir Formen, so als würden wir eines der verschiedenen Formwerkzeuge verwenden, mit der Ausnahme, dass wir keine vordefinierte Form wie ein Rechteck oder eine Ellipse zeichnen konnte jede Form zeichnen, die wir wollten. Wie ich schon sagte, das ist nicht das, was wir wollen. Wir wollen das Symbol daneben, das Pfad-Symbol, also klicken Sie darauf, um es auszuwählen:

Photoshop-Tutorials: Klicken Sie in der Optionsleiste auf das Symbol "Pfade", um mit dem Stiftwerkzeug mit Pfaden zu arbeiten.
Klicken Sie mit dem ausgewählten Stiftwerkzeug und dem ausgewählten Pfadsymbol in der Optionsleiste einmal auf eine beliebige Stelle in Ihrem Dokument. Nicht klicken und ziehen, nur klicken. Wenn Sie dies tun, fügen Sie einen kleinen quadratischen Punkt hinzu. Ich habe es hier vergrößert:

Klicken Sie mit dem Stiftwerkzeug einmal in das Dokument, um einen Punkt hinzuzufügen.
Dieser erste Punkt, den wir gerade hinzugefügt haben, ist der Ausgangspunkt unseres Weges. Momentan haben wir eigentlich keinen Weg. Wir haben nur einen Ausgangspunkt. Der "Punkt" wird technisch als Anker oder Ankerpunkt bezeichnet und heißt so, weil er den Pfad an seinem Platz verankert . Dieser erste Punkt verankert den Anfang des Pfads an dieser Stelle im Dokument. Wenn wir weitere Punkte hinzufügen, wird jeder von ihnen den Pfad an dieser Stelle verankern.
Fügen wir einen weiteren Punkt hinzu. Klicken Sie irgendwo anders in das Dokument. Überall wird es gehen. Ich klicke irgendwo rechts von meinem Anfangspunkt:

Photoshop-Tutorials: Fügen Sie einen zweiten Ankerpunkt hinzu, indem Sie auf eine andere Stelle im Dokument klicken.
Ich habe jetzt einen zweiten Ankerpunkt hinzugefügt und schau, was passiert ist. Ich habe jetzt eine gerade Linie, die die beiden Punkte miteinander verbindet! Diese gerade Linie ist mein Weg. Wie bereits erwähnt, benötigen wir mindestens zwei Punkte, um einen Pfad zu erstellen, da wir wissen müssen, wo der Pfad beginnt und wo er endet, und jetzt, da wir sowohl einen Start- als auch einen Endpunkt haben, konnte Photoshop den verbinden zwei Punkte zusammen, die unseren Weg schaffen.
Fügen wir noch ein paar Punkte hinzu, nur zum Spaß. Klicken Sie noch einige Male auf verschiedene Stellen im Dokument. Wieder nicht klicken und ziehen, sondern nur klicken:
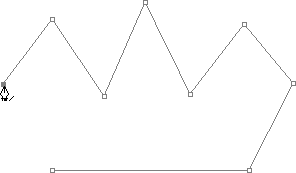
Fügen Sie weitere Punkte hinzu, indem Sie auf verschiedene Stellen im Dokument klicken.
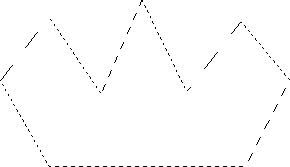
Im obigen Bild habe ich sieben weitere Ankerpunkte hinzugefügt, indem ich mit dem Stift-Werkzeug auf verschiedene Stellen geklickt habe. Jedes Mal, wenn ich einen hinzugefügt habe, hat sich die Länge meines Pfads erhöht, da zwischen dem vorherigen Punkt und ein neues Pfad- "Segment" hinzugefügt wurde der neue Punkt. Mein Pfad besteht jetzt aus neun Ankerpunkten und acht Pfadsegmenten. Ich könnte weiter im Dokument herumklicken, um weitere Ankerpunkte und Pfadsegmente hinzuzufügen, aber jetzt möchte ich meinen Pfad wirklich schließen, damit er eine vollständige Form bildet.
Einen Pfad schließen
Um einen Pfad zu schließen, müssen wir nur noch einmal auf unseren Startpunkt klicken. Wenn Sie den Mauszeiger über den Startpunkt bewegen, wird in der rechten unteren Ecke des Stiftsymbols ein kleiner Kreis angezeigt:

In der rechten unteren Ecke des Stiftsymbols wird ein kleiner Kreis angezeigt, wenn Sie den Mauszeiger über den Anfangspunkt des Pfads bewegen.
Dieser Kreis sagt uns, dass wir uns auf dem Weg "vollkreisen" und ihn dort beenden, wo er begonnen hat. Zum Schließen einfach direkt auf den Startpunkt klicken.
Wir können unten sehen, dass mein Pfad zu einem geschlossenen Pfad geworden ist und nun eine Grundform einer Form darstellt:
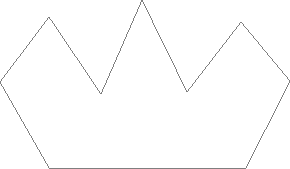
Der Pfad ist jetzt geschlossen und endet am Startpunkt. Dadurch wird ein geschlossener Pfad erstellt.
Obwohl dieser Pfad nur zum Spaß als Beispiel für das Zeichnen eines einfachen Pfads mit dem Stiftwerkzeug gezeichnet wurde, kann ich diesen Pfad problemlos in eine Auswahl umwandeln. Dafür benötigen wir die Photoshop-Palette „Pfade“, und wir werden uns das als Nächstes ansehen.
Einen Pfad in eine Auswahl verwandeln
Bisher haben wir uns angesehen, was ein Pfad ist und wie man mit dem Photoshop-Stiftwerkzeug einen einfachen Pfad zeichnet. Aber wie treffen Sie eine Auswahl aus dem Pfad?
Einfach! Es gibt verschiedene Möglichkeiten, einen Pfad in eine Auswahl zu verwandeln, einschließlich einer praktischen Tastenkombination. Bevor wir uns jedoch den schnellen Weg ansehen, schauen wir uns den offiziellen Weg an. Der "offizielle Weg" besteht darin, die Photoshop-Palette "Pfade" zu verwenden, die in die Ebenen- und die Kanäle-Palette unterteilt ist:
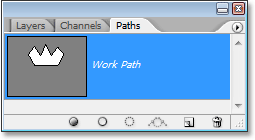
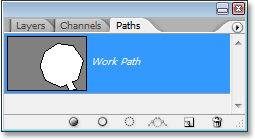
Photoshop-Palette "Pfade".
Auf den ersten Blick ähnelt die Palette „Pfade“ der Palette „Ebenen“ von Photoshop. Adobe hat sie absichtlich so gestaltet, dass Sie sich bei der Verwendung sicherer fühlen. Wir können eine Vorschau der Form des Pfads sehen, den wir gerade erstellt haben, und standardmäßig nennt Photoshop den Pfad "Arbeitspfad", was im Grunde genommen eine ausgefallene Art ist, "temporär" zu sagen, als ob Sie einen anderen erstellen würden Pfad Wenn Sie diesen Pfad jetzt nicht zuerst in einen anderen Pfad umbenennen, wird dieser Pfad durch den neuen Pfad ersetzt. Sie können nur einen "Arbeitspfad" haben. Wenn Sie ihn also behalten möchten, müssen Sie in der Palette "Pfade" auf seinen Namen doppelklicken und ihm einen anderen Namen geben, bevor Sie einen neuen Pfad erstellen.
Da mein Pfad ein bisschen wie eine Krone aussieht, doppelklicke ich auf den Namen "Arbeitspfad". Daraufhin wird das Dialogfeld "Pfad speichern" von Photoshop geöffnet, und ich benenne meinen Pfad in "Krone" um:

Sie können einen temporären "Arbeitspfad" einfach durch Umbenennen speichern.
Wenn ich fertig bin, klicke ich auf "OK". Wenn ich jetzt noch einmal in der Palette "Pfade" nachschaue, sehe ich, dass mein "Arbeitspfad" in "Krone" umbenannt wurde:
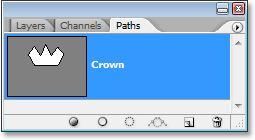
Die Pfade-Palette zeigt an, dass der Pfad in "Krone" umbenannt wurde.
Durch das Umbenennen wird der Pfad jetzt gespeichert und verschwindet nicht auf mir, wenn ich einen neuen Pfad erstelle. Außerdem werden alle gespeicherten Pfade mit dem Photoshop-Dokument gespeichert. Wenn ich mein Dokument speichere, wird der Pfad jetzt mit diesem gespeichert, und wenn ich das Dokument das nächste Mal öffne, befindet sich der Pfad weiterhin in der Palette „Pfade“.
Das Speichern eines Pfades ist nichts, was Sie tun müssen, um ihn in eine Auswahl zu verwandeln. In den meisten Fällen müssen Sie den Pfad nicht mehr speichern, wenn Sie mit dem Stift-Werkzeug eine Auswahl treffen. Wenn Sie es dennoch speichern möchten, benennen Sie es einfach in einen anderen Pfad als "Arbeitspfad" um und es wird gespeichert.
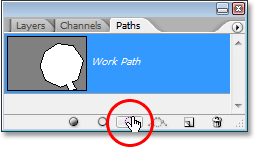
Wenn Sie den Pfad in eine Auswahl verwandeln möchten, sehen Sie am unteren Rand der Palette "Pfade" mehrere Symbole. Diese Symbole ermöglichen es uns, auf unserem Weg verschiedene Dinge zu tun. Das erste Symbol auf der linken Seite ist das Symbol Pfad mit Vordergrundfarbe füllen. Wenn Sie darauf klicken, wird der Pfad, wie der Name schon sagt, mit unserer aktuellen Vordergrundfarbe gefüllt. Interessant, aber das wollen wir nicht. Das zweite Symbol von links ist der Strichpfad mit dem Pinselsymbol, mit dem ein Strich mit dem aktuell ausgewählten Pinsel auf unseren Pfad angewendet wird.
Dies ist eine großartige Möglichkeit, um interessante Effekte in Photoshop zu erstellen, aber für das, was wir hier tun, einen Pfad in eine Auswahl zu verwandeln, ist es auch nicht das, was wir wollen. Das gewünschte ist das dritte Symbol von links, der Ladepfad als Auswahlsymbol:
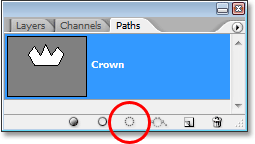
Das Symbol "Pfad als Auswahl laden" am unteren Rand der Palette "Pfade".
Sobald ich auf dieses Symbol klicke, wird mein Pfad in meinem Dokument zu einer Auswahl, als hätte ich sie mit einem der gängigsten Auswahlwerkzeuge von Photoshop erstellt:
Der Pfad wurde nun in eine Auswahl umgewandelt.
So einfach ist das! Dies ist sogar noch einfacher, da es eine Tastenkombination gibt, mit der Sie einen Pfad in eine Auswahl verwandeln können, ohne dass Sie dazu zur Palette "Pfade" wechseln müssen. Wenn Sie Ihren Pfad gezeichnet haben und bereit sind, ihn in eine Auswahl umzuwandeln, drücken Sie einfach Strg + Eingabetaste (Win) / Befehlstaste + Return (Mac), damit Photoshop den Pfad in eine Auswahl umwandelt.
Inzwischen ist es für Sie vielleicht ein wenig offensichtlicher, warum das Stiftwerkzeug zwar ein Auswahlwerkzeug ist, jedoch nicht mit den anderen Auswahlwerkzeugen oben in der Palette Werkzeuge gruppiert ist. Der Grund dafür ist, dass das Stiftwerkzeug in erster Linie ein Pfadwerkzeug ist. Es erstellt Auswahlen, indem zuerst Pfade erstellt werden. Aus diesem Grund haben sie mehr Gemeinsamkeiten mit den verschiedenen Formwerkzeugen und dem Typwerkzeug, die alle Pfade verwenden, als mit den grundlegenden Auswahlwerkzeugen wie dem Auswahlrechteck oder dem Lasso Werkzeug, das nur auf Pixeln basierende Auswahlen vornimmt.
Schauen wir uns ein praktisches Beispiel an, was wir bisher gelernt haben. Hier haben wir ein Foto von einem Stoppschild vor einigen felsigen Klippen:

Ein Foto von einem Stoppschild.
Angenommen, ich wollte dieses Stoppschild auswählen, damit ich es auf eine eigene Ebene kopieren kann. Das Stoppschild besteht aus nichts anderem als einer Reihe von geraden Linien, was dies extrem einfach machen wird. Zuerst brauche ich einen Startpunkt für meinen Weg, also beginne ich in der oberen linken Ecke des Zeichens, indem ich einmal klicke, um einen anfänglichen Ankerpunkt zu platzieren. In diesem Fall ist es eigentlich egal, wo ich den Pfad beginne, aber ich beginne in der oberen linken Ecke:
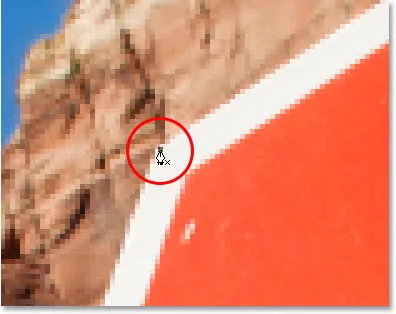
Klicken Sie einmal in die linke obere Ecke des Stoppschilds, um den Pfad mit einem anfänglichen Ankerpunkt zu beginnen.
Beachten Sie, wie ich hier hineingezoomt bin, wenn ich klicke. Sie finden es einfacher, wenn Sie mit dem Stift-Werkzeug eine Auswahl treffen, um das Bild ein wenig zu vergrößern. Auf diese Weise können Sie sicher sein, dass Sie Ihren Pfad nur in dem Bereich behalten, den Sie auswählen möchten.
Im Moment habe ich keinen Weg, ich habe nur einen Ausgangspunkt für meinen Weg. Um den Pfad zu erstellen, muss ich nur um das Schild herumgehen und an jeder Ecke, an der der Pfad die Richtung ändern muss, einen Ankerpunkt einfügen. Wenn ich jeden Ankerpunkt hinzufüge, wird ein neues Pfadsegment angezeigt, das den vorherigen Ankerpunkt mit dem neuen verbindet, bis ich das Zeichen vollständig umrundet habe. Um den Pfad zu schließen, klicke ich einfach wieder auf den Startpunkt. In der Abbildung unten ist es etwas schwer zu erkennen, aber ich habe jetzt einen Pfad um das gesamte Stoppschild herum, einschließlich des Pfostens, an dem es angebracht ist. Klicken Sie einfach in die Ecken, in denen der Pfad die Richtung ändern muss:

Rund um das Stoppschild im Bild wird jetzt ein Pfad angezeigt.
Wenn ich jetzt in meine Pfade-Palette schaue, sehe ich sehr deutlich, dass ich einen Pfad in Form des Stoppschilds habe:
Photoshop-Palette „Pfade“ mit dem Pfad, der um das Stoppschild herum gezeichnet ist.
Beachten Sie, wie Photoshop den Pfad "Arbeitspfad" benannt hat. Dies bedeutet, dass dieser Pfad temporär ist und ich ihn verlieren werde, wenn ich einen anderen Pfad erstelle, ohne diesen zuerst durch Umbenennen zu speichern. Auch wenn ich keinen neuen Pfad erstelle, geht dieser beim Schließen des Dokuments verloren, es sei denn, ich speichere ihn zuerst. Ich muss diesen Pfad jedoch nicht speichern, daher mache ich mir darüber keine Sorgen. In den meisten Fällen müssen Sie sich auch keine Sorgen machen.
Um meinen Pfad in eine Auswahl umzuwandeln, klicke ich unten in der Ebenen-Palette auf das Symbol Pfad laden als Auswahl oder drücke einfach Strg + Eingabetaste (Win) / Befehlstaste + Eingabetaste (Mac):
Klicken Sie in der Palette "Pfade" auf das Symbol "Pfad als Auswahl laden" oder drücken Sie "Strg + Eingabe" (Windows) / "Befehl + Löschen" (Mac), um den Pfad in eine Auswahl zu konvertieren.
Sobald ich das tue, wird mein Pfad in eine Auswahl umgewandelt und das Stoppschild ist jetzt ausgewählt:

Das Stoppschild ist jetzt ausgewählt, nachdem der Pfad in eine Auswahl konvertiert wurde.
Ich wechsle wieder zu meiner Ebenen-Palette und kopiere das Stoppschild auf eine eigene Ebene. Dazu verwende ich die Tastenkombination Strg + J (Win) / Befehlstaste + J (Mac), mit der das Zeichen für sich alleine platziert wird Ebene über der Hintergrundebene:
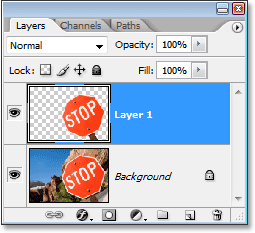
Das Stoppschild wurde jetzt auf eine eigene Ebene kopiert.
Mit dem Schild auf einer eigenen Ebene kann ich tun, was ich will, den Hintergrund mit einem anderen Bild tauschen oder den Hintergrund schwarz und weiß machen, während das Schild in Farbe bleibt, was mir einfällt. Der Punkt ist, dass ich das Zeichen einfach auswählen konnte, indem ich mit dem Stift-Werkzeug in die Ecken klickte, wodurch ein Pfad um das Zeichen erstellt wurde, und dann den Pfad einfach in eine Auswahl umwandelte.
Bisher haben wir beim Treffen von Auswahlen mit dem Stiftwerkzeug in Photoshop festgestellt, dass der Stift in jeder Hinsicht ein Auswahlwerkzeug ist, da Photoshop häufigere Auswahlwerkzeuge wie das rechteckige Auswahlrechteck und die Lasso-Werkzeuge verwendet, die jedoch nicht auf der Auswahl basieren Auf Pixeln zeichnet das Stift-Werkzeug wie auf anderen Werkzeugen Pfade, die entweder über die Pfade-Palette oder über die schnelle Tastenkombination einfach in Auswahlen umgewandelt werden können.
Aus diesem Grund befindet sich der Stift bei diesen anderen pixelbasierten Auswahlwerkzeugen nicht oben in der Werkzeugpalette, sondern ist in die Pfadwerkzeuge wie die verschiedenen Formwerkzeuge, das Textwerkzeug sowie die Pfadauswahl- und Direktauswahlwerkzeuge unterteilt . Beim Stift-Werkzeug dreht sich alles um Pfade, nicht um Pixel.
Wir haben gelernt, dass wir Ankerpunkte in unserem Dokument hinzufügen können, die den Pfad an Ort und Stelle verankern, indem Sie einfach mit dem Stiftwerkzeug auf verschiedene Stellen klicken. Wenn wir immer mehr Ankerpunkte hinzufügen, erstellen wir einen Pfad für jeden neuen Punkt wird durch ein neues Pfadsegment mit dem vorherigen Punkt verbunden. Wir haben auch erfahren, dass ein Pfad das ist, was normalerweise als "Nicht-Druck-Element" bezeichnet wird, was bedeutet, dass egal wie viele Pfade wir hinzufügen, keiner von ihnen auf dem Papier sichtbar ist, wenn wir das Bild drucken . Sie sind auch nicht sichtbar, wenn wir das Bild auf einer Website anzeigen. Pfade sind nur für uns sichtbar, wenn Sie in Photoshop arbeiten (obwohl andere Programme wie Adobe Illustrator auch Pfade unterstützen). Erst wenn wir etwas mit dem Pfad tun, ihn beispielsweise mit einer Farbe füllen, ihm einen Strich zuweisen oder ihn in eine Auswahl umwandeln, wird der Pfad mehr als nur eine einfache, nicht druckbare Kontur einer Form.
Wir haben gesehen, wie einfach es wäre, mit dem Stift-Werkzeug so etwas wie ein Stoppschild auszuwählen, indem Sie es mit einem Pfad aus einer Reihe gerader Pfadsegmente skizzieren und dann den Pfad in eine Auswahl umwandeln. Das ist großartig, aber im Grunde haben wir noch nichts getan, was wir mit dem Lasso-Werkzeug oder noch besser mit dem polygonalen Lasso-Werkzeug, das speziell für die Auswahl von flachen Formen wie unserem Anschlag entwickelt wurde, nicht einfacher hätten machen können Zeichen. Es besteht die Möglichkeit, dass Sie früher oder später etwas Interessanteres auswählen möchten, und mit "interessant" meine ich eine größere Herausforderung, es sei denn, Sie haben eine merkwürdige Faszination für Verkehrszeichen. Und mit "herausfordern" meine ich etwas, das Kurven enthält. Wenn Sie in Photoshop ein gekrümmtes Objekt auswählen, verlieren Sie normalerweise jeglichen Respekt vor den grundlegenden Auswahlwerkzeugen. Glücklicherweise ist es auch die Zeit, in der das Stiftwerkzeug wirklich glänzt!
Bevor wir fortfahren, sollte ich darauf hinweisen, dass alles, was wir bis zu diesem Punkt getan haben, ziemlich einfach war. Klicken Sie hier, klicken Sie dort, konvertieren Sie den Pfad in eine Auswahl, fertig. Der nächste Teil, in dem wir uns mit dem Zeichnen von Kurven befassen, ist nicht ganz so einfach, auch wenn es mit Sicherheit nicht schwierig ist bisschen unnatürlich und sogar ein wenig überwältigend. Dies ist definitiv der Punkt, an dem die Analogie des "Fahrradfahrens" zum Tragen kommt. Sie können zunächst ein paar Mal abfallen und sich fragen, wie es jemand schafft, aber je mehr Sie üben und je mehr Sie daran festhalten, desto sinnvoller wird es beginnt zu machen. In kürzester Zeit wird es Ihnen wie eine Selbstverständlichkeit erscheinen und Sie werden plötzlich verstehen, warum so viele Menschen schwören, dass das Stiftwerkzeug das größte Auswahlwerkzeug in Photoshop überhaupt ist! Im Ernst, es ist wirklich so.
Richtungsgriffe im Griff
Beginnen wir noch einmal mit dem Stift-Werkzeug. Öffnen Sie ein neues leeres Photoshop-Dokument oder löschen Sie einfach das, was Sie bisher im vorhandenen Dokument getan haben, damit wir neu anfangen. Wenn Sie dann das Stift-Werkzeug und die Option Pfade in der Optionsleiste ausgewählt haben (denken Sie daran, dass standardmäßig die Option Ebenen formen ausgewählt ist, damit Sie sicherstellen müssen, dass die Option Pfade ausgewählt ist), klicken Sie genau so auf eine beliebige Stelle in Ihrem Dokument das haben wir schon mal gemacht. Diesmal klicken Sie jedoch nicht nur, um einen Ankerpunkt hinzuzufügen, sondern ziehen Sie die Maus ein Stück vom Ankerpunkt weg, bevor Sie die Maustaste loslassen:
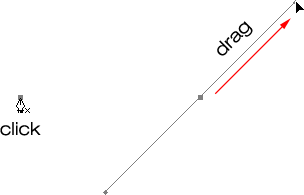
Klicken Sie mit dem Stift-Werkzeug auf eine beliebige Stelle innerhalb des Dokuments und ziehen Sie es dann ein Stück vom Ankerpunkt weg.
Wenn Sie fertig sind, sehen Sie einen Ankerpunkt, von dem zwei Linien ausgehen. Auf den ersten Blick könnte man meinen, wir haben es irgendwie geschafft, mit dem Stift-Werkzeug einen Pfad herauszuziehen. Immerhin sieht es so aus, als hätten wir drei Ankerpunkte, einen an jedem Ende und einen in der Mitte, die durch zwei Pfadsegmente verbunden sind. Wenn wir etwas genauer hinschauen, können wir feststellen, dass die Punkte an beiden Enden etwas kleiner sind als in der Mitte und dass sie tatsächlich eine andere Form haben. Das mittlere ist quadratisch, und wie wir gesehen haben, ist ein Ankerpunkt quadratisch, aber die an beiden Enden scheinen rautenförmig zu sein. Sind einige Ankerpunkte quadratisch und einige rautenförmig?
Nee. Alle Ankerpunkte sind quadratisch und haben dieselbe Größe. Dies bedeutet, dass die kleineren, rautenförmigen Punkte an den Enden keine Ankerpunkte sind. Und wenn es sich nicht um Ankerpunkte handelt, bedeutet dies, dass die Linien keine Pfadsegmente sind, da wir mindestens zwei Ankerpunkte benötigen, um einen Pfad zu erstellen, und der einzige Ankerpunkt, den wir derzeit haben, ist der in der Mitte. Was genau sind dann die Linien, die vom Ankerpunkt ausgehen? Sie sind Richtungsgriffe!
"Ah, Richtungsgriffe!" du sagst. "Jetzt habe ich es verstanden!"
… … …………….
"Warte, nein, tue ich nicht. Was zum Teufel sind Richtungsgriffe?"
Richtungshandles sind eigentlich Handles und werden nur beim Erstellen gekrümmter Pfadsegmente verwendet. Beim Erstellen von geraden Pfadsegmenten sind keine Richtungshandles erforderlich. Normalerweise gibt es zwei davon, manchmal nur einen, und wie wir bereits gesehen haben, erstrecken sie sich von Ankerpunkten aus. Sie werden "Griffe" genannt, weil Sie sie, wie wir gleich sehen werden, tatsächlich greifen und bewegen können.
Richtungsgriffe steuern zwei Dinge. Sie steuern den Winkel der Kurve, und sie steuern die Länge der Kurve, und sie tun es auf eine wirklich saubere Art und Weise. Der Grund, warum es normalerweise zwei davon gibt, ist, dass einer den Winkel und die Länge der Kurve steuert, die in den Ankerpunkt eintritt, und der andere den Winkel und die Länge der Kurve, die aus dem Ankerpunkt herausfließt.
Bevor wir uns mit dem Zeichnen von Kurven mit den Richtungsgriffen befassen, wollen wir zunächst sehen, wie die Griffe selbst gesteuert werden, da unser Erfolg beim Zeichnen von Kurven in hohem Maße von unserer Fähigkeit abhängt, die Griffe zu steuern. Keine Sorge, es ist keine Raketenwissenschaft. Es gibt nur ein paar einfache Dinge, die Sie lernen müssen. Wir haben bereits gesehen, wie Sie Richtungshandles erstellen, indem Sie mit dem Stiftwerkzeug klicken und dann vom Ankerpunkt wegziehen. Je weiter wir vom Ankerpunkt weg ziehen, desto länger sind die Richtungsgriffe. Je länger der Griff, desto länger die Kurve. Kurzer Griff, kurze Kurve. Langer Griff, lange Kurve.
Eines der schönen Dinge, die Sie ziemlich schnell über das Stiftwerkzeug lernen werden, ist, dass es äußerst verzeihend ist. Es gibt überhaupt keinen Grund, sich darum zu sorgen, dass die Dinge beim Zeichnen von Pfaden gleich beim ersten Mal richtig laufen, da wir zurückgehen und die Dinge einfach reparieren können, wenn wir fertig sind! Haben Sie einen Ankerpunkt an der falschen Stelle platziert? Kein Problem! Bewegen Sie es einfach dorthin, wo Sie es brauchen! Wir werden gleich sehen, wie das geht. Haben Sie einen Richtungspunkt in die falsche Richtung gezogen? Kein Problem. Fassen Sie den Griff und drehen Sie ihn in die gewünschte Richtung. Wir werden wieder sehen, wie das geht. Ist einer Ihrer Richtungsgriffe zu lang oder zu kurz? Überhaupt kein Problem. Klicken Sie einfach darauf und ziehen Sie es dann nach Bedarf länger oder kürzer (ja, wir werden auch sehen, wie das geht). Die Pfade können jederzeit vollständig bearbeitet werden. Es besteht also absolut kein Grund, sich Gedanken zu machen, ob Sie einen Fehler machen oder ihn gleich beim ersten Mal korrigieren. Fühlst du dich dann nicht schon ein bisschen besser?
Richtungsgriffe drehen und in der Größe ändern
Wie ich bereits erwähnt habe, werden sie als Richtungsgriffe bezeichnet, da Sie sie wie Griffe greifen und verschieben können. Mal sehen, wie das geht. Zunächst wird untersucht, wie beide Griffe gleichzeitig gedreht werden. Halten Sie mithilfe des Ankerpunkts und der beiden bereits erstellten Richtungsgriffe die Strg- (Win) / Befehlstaste (Mac) gedrückt. Das Symbol für das Stiftwerkzeug wird vorübergehend zum Symbol für das Direktauswahlwerkzeug (weißer Pfeil). Wenn das Stiftwerkzeug ausgewählt ist, wird das Halten von "Strg / Befehl" zu einer Schnellverknüpfung für den vorübergehenden Zugriff auf das Direktauswahlwerkzeug was wir verwenden, um verschiedene Teile unseres Weges auszuwählen. Klicken Sie dann einfach direkt auf die kleine Rautenform am Ende eines der Richtungsgriffe (das Klicken auf die "Linie" selbst funktioniert nicht. Sie müssen also immer auf die Rautenform am Ende eines Griffs klicken, um etwas zu tun mit ihm) und ziehen Sie es um den Ankerpunkt, um es zu drehen. Wenn Sie einen der Griffe drehen, dreht sich der andere mit in die entgegengesetzte Richtung, ähnlich einer Wippe. Möglicherweise stellen Sie auch fest, dass sich Ihr Mauszeigersymbol erneut ändert, sobald Sie mit dem Ziehen des Ziehpunkts beginnen. Diesmal wird es zum Symbol für das Verschieben-Werkzeug, da wir etwas von einer Stelle zur anderen verschieben:
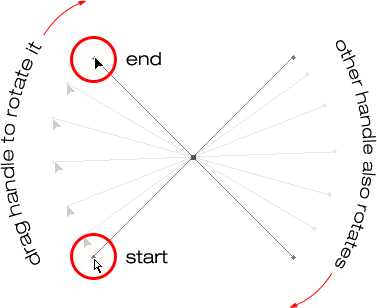
Halten Sie "Strg" (Win) / "Befehl" (Mac) gedrückt und klicken Sie auf das Ende eines der Richtungsgriffe. Ziehen Sie dann den Griff, um ihn um den Ankerpunkt zu drehen. Wenn Sie einen Griff ziehen, dreht sich der andere in die entgegengesetzte Richtung.
Sie können die Taste "Strg / Befehl" loslassen, sobald Sie mit dem Ziehen des Griffs begonnen haben. Sie müssen es nicht die ganze Zeit durchhalten.
Um die Größe eines Richtungsgriffs beim Drehen zu ändern, ziehen Sie einfach das Ende des Griffs in Richtung des Ankerpunkts, um ihn zu verkürzen, oder ziehen Sie ihn vom Ankerpunkt weg, um ihn zu verlängern. Wie oben erwähnt, wird die Kurve durch einen kürzeren Griff kürzer und durch einen längeren Griff länger. Sie können jedoch nicht beide Ziehpunkte gleichzeitig vergrößern oder verkleinern. Wenn Sie also beide Ziehpunkte vergrößern oder verkleinern möchten, müssen Sie sie einzeln ziehen. Sie können nur beide gleichzeitig drehen. Wenn Sie Ihre Maustaste nach dem Drehen der Ziehpunkte bereits losgelassen haben und der Cursor wieder zum Stiftwerkzeug-Symbol gewechselt ist und Sie die Größe eines der Ziehpunkte ändern müssen, müssen Sie "Strg / Befehl" erneut gedrückt halten, um vorübergehend zu arbeiten Wechseln Sie zurück zum Direktauswahl-Werkzeug und klicken und ziehen Sie das Ende des Ziehpunkts, um dessen Größe zu ändern:
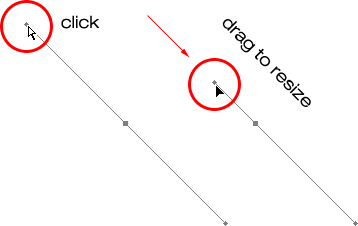
Ziehen Sie die Enden der Ziehpunkte zum Ankerpunkt, um sie zu kürzen, oder ziehen Sie sie vom Ankerpunkt weg, um sie zu verlängern.
Schauen wir uns nun an, wie Sie die Griffe unabhängig voneinander drehen. To rotate one handle without affecting the other one, first release your mouse button if you've been rotating or resizing the handles so your cursor changes back into the Pen Tool icon. Then, instead of holding down "Ctrl/Command", which moves both handles at once, hold down your Alt (Win) / Option (Mac) key and click on the end of either of the direction handles. You'll see your cursor change into the Convert Point Tool icon, which looks like a simplified arrow made of only two lines, almost like an upside down letter "v" (except that it's not quite upside down). Then, simply drag the handle around the anchor point to rotate it, just as you did before, and this time, the handle will rotate independently of the other one, breaking the connection between them:
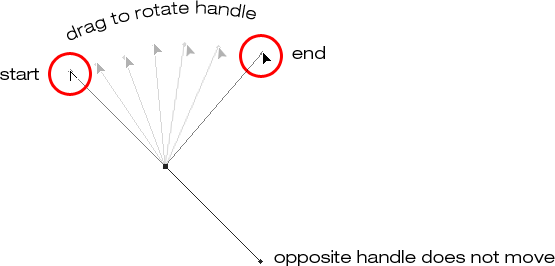
Hold down "Alt" (Win) / "Option" (Mac) and click on the end of either of the direction handles, then drag the handle to rotate it around the anchor point independently of the other handle.
Again, you can release your "Alt/Option" key after you've started dragging. You don't have to hold it down the whole time.
You can also resize direction handles using the "Alt/Option" key in exactly the same way as you can with the "Ctrl/Command" key. If you're in the process of rotating a handle, simply drag it in towards the anchor point to make it shorter or away from the anchor point to make it longer. If you've already released your mouse button and your cursor is showing the Pen Tool icon again, you'll need to hold down "Alt/Option" once again, then click on the end of the handle and drag it to resize it.
Is there a difference between resizing the handles using "Ctrl/Command" and using "Alt/Option" to do it? Yes there is. If you haven't yet "broken the connection" between the handles by dragging one independently of the other, resizing a handle using "Ctrl/Command" will keep the handles connected together. It won't resize both handles at once, but it won't break the connection between them either so you'll still be able to rotate them together if you need to. If you resize a handle using "Alt/Option", you'll break the connection between the handles. Even if you don't rotate the handle as you're resizing it, the connection will still be broken.
What if you've broken the connection between the handles by rotating them using "Alt/Option" and then want to rotate them together again? Can you "rebuild the connection", so-to-speak, by selecting one of them while holding down "Ctrl/Command" as before? Good question, and the answer is no. Once you've broken the connection between the handles, the "Ctrl/Command" key on its own won't bring it back. You'll need to select one of the handles while holding Ctrl+Alt (Win) / Command+Option (Mac) at that point in order to move the handles together again.
Quick Summary So Far …
We've covered a lot of information here about working with direction handles, so before we move on and start drawing some actual curves, let's do a quick recap:
- To add an anchor point, simply click with the Pen Tool.
- To add an anchor point with direction handles extending out from it, click with the Pen Tool, then drag away from the anchor point before releasing your mouse button. The further you drag, the longer the direction handles will be.
- To rotate the direction handles together, hold down Ctrl (Win) / Command (Mac), which will temporarily switch you to the Direct Selection Tool, then click on the end of either handle and drag it around the anchor point. The other handle will rotate in the opposite direction.
- To rotate the direction handles independently, hold down Alt (Win) / Option (Mac), which will temporarily switch you to the Convert Point Tool, then click on the end of either handle and drag it around the anchor point. The other handle will not rotate.
- To resize handles without breaking the connection between them, hold down Ctrl (Win) / Command (Mac) to switch to the Direct Selection Tool, then click on the end of either handle. Drag it towards the anchor point to make it shorter, or drag it away from the anchor point to make it longer.
- To resize handles and break the connection between them, hold down Alt (Win) / Option (Mac) to switch to the Convert Point Tool, then click on the end of either handle. Drag it towards the anchor point to make it shorter, or drag it away from the anchor point to make it longer.
- To rotate the direction handles together after breaking the connection, hold down Ctrl+Alt (Win) / Command+Option (Mac), then click on the end of either handle and drag it around the anchor point. The other handle will once again rotate with it.
Okay, that pretty much covers the basics of how to control the direction handles. Let's see how we can use them to draw some curves!
We've covered a lot of ground so far. We know about anchor points and direction handles. We know that in order to draw straight path segments, all we need to do is lay down a series of anchor points wherever we need them simply by clicking with the Pen Tool, and as we add more and more anchor points, we add more straight sections to our path. We know how to create direction handles and how to rotate them, either together or separately, and how to resize them.
We know how to turn a path into a selection by clicking on the "Load path as selection" icon at the bottom of the Paths palette or by simply pressing "Ctrl+Enter" (Win) / "Command+Return" (Mac) on the keyboard. One thing I didn't mention yet is that regardless of whether our path consists of straight lines,
curves, or a combination of straight lines and curves, converting it into a selection is done exactly the same way, and we've already learned how to do it, which means we're well on our way to mastering making selections with the pen! All we need to do is get a bit of practice drawing curves, which is exactly what we're about to do!
Scrollen Sie noch? Laden Sie dieses Tutorial als PDF herunter!
Drawing A Curve
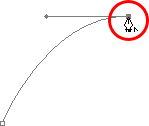
Let's once again start fresh, either by opening up a new blank document in Photoshop or by deleting what you've already done. We're going to draw our first curve so we can put all of our newly-aquired direction handle knowledge to use. First, with the Pen Tool selected and the Paths option selected in the Options Bar, click once somewhere in your document to add an anchor point. Just click, don't click and drag. You should have one single anchor point on the screen when you're done.
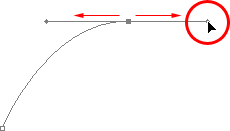
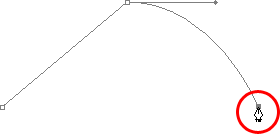
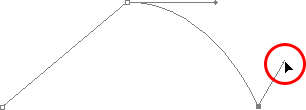
Then, move your mouse cursor up and to the right of your initial anchor point. Click again to add a second anchor point, but this time, drag your mouse a little to the right of the anchor point to drag out direction handles. Hold down Shift as you drag to constrain your movement to a horizontal direction. As you drag out the direction handles, you'll see your path appearing as a curve between the two anchor points! The further you drag your mouse, the longer you make the direction handles, and the more of a curve you create:
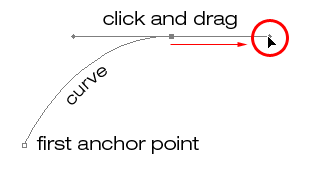
Click once to add an anchor point, then click and drag out a second anchor point with direction handles, creating a curved path segment between the two points.
Click down and to the right of the second anchor point to add a third anchor point. This time, don't click and drag, just click:
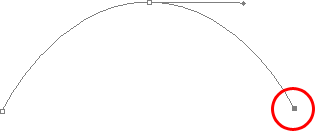
Add a third anchor point down and to the right of the second one by clicking with the Pen Tool.
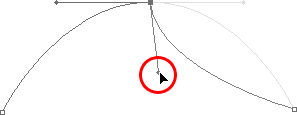
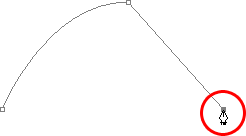
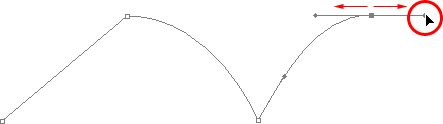
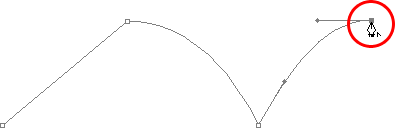
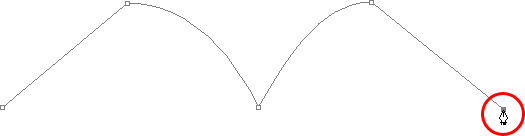
As soon as you add the third anchor point, a second path segment will appear, joining the second anchor point with the third one. And because our second anchor point has direction handles extending from it, this new path segment is also curved! We now have a nice, smooth arc starting from the first point on the left, then passing through the anchor point with the direction handles up top, and coming to an end at the third point.
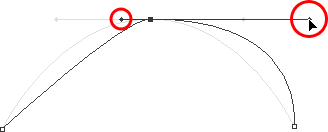
One thing you may have noticed, and you can see it in the screenshot above, is that when you added the third anchor point, the direction handle extending out the left side of the second anchor point disappeared. It's still there, Photoshop simply hid it from view. To see it again, use the keyboard shortcut we've already learned to temporarily switch to the Direct Selection Tool, which is by holding down the Ctrl (Win) / Command (Mac) key, and then click on the second anchor point to select it. As soon as you do, the missing direction handle reappears as if it was there the whole time (which it was):

Hold down the "Ctrl" (Win) / "Command" (Mac) key to temporarily switch to the Direct Selection Tool, then click on the top anchor point to select it. The missing anchor point reappears.
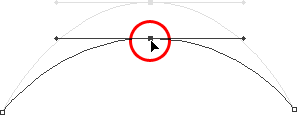
With your "Ctrl/Command" key still held down so you still have access to the Direct Selection Tool, try resizing each direction handle by clicking on the end of each one to select it and then dragging it towards and away from its anchor point. Again, hold "Shift" as you drag to constrain your movement horizontally, and watch what happens. As you increase the length of a handle, you get more of a curve, and as you decrease its length, you get less of a curve. Also notice that each handle controls its own side of the curve. The handle on the left controls the curve coming into the anchor point from the left, and the handle on the right controls the curve flowing out from the anchor point on the right.
Here, I've made my handle on the left shorter, and as we can see, there's much less of a curve now than there was originally, almost becoming a straight line. I've also made the handle on the right longer, and as a result, the curve on the right is now much more pronounced. The faint curve is the original for comparison:
Change the shape of the curves by resizing the direction handles. The left handle controls the left curve, and the right handle controls the right curve.
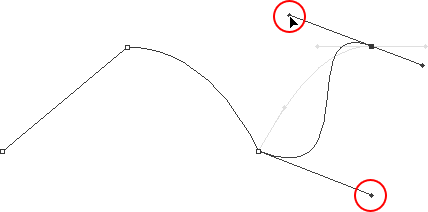
I'm going to undo my changes by pressing Ctrl+Alt+Z (Win) / Command+Option+Z (Mac) a couple of times to set my direction handles back to their original sizes so they're equal length once again. Now let's try rotating the handles. Hold down "Ctrl/Command" once again to access the Direct Selection Tool, then click on the end of either handle to select it and try rotating it around the anchor point. Since we selected the handle with "Ctrl/Command", both handles rotate together. Here I've dragged my left handle down and to the right, and the angle of the curve on the left changed along with it, now appearing as more of a slope as it rises up towards the anchor point. By dragging the left handle down and to the right, I caused the right handle to rotate up and to the left, and again, the angle of the curve on the right changed along with it, now rising above the anchor point briefly before making a steep decent down to the anchor point on the right. Again, the faint curve is the original for comparison:
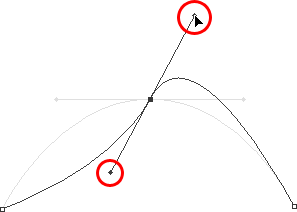
Rotate the direction handles to change the angle of the curves. Select a handle while holding "Ctrl" (Win) / "Command" (Mac) to rotate both handles together.
The Dreaded "Loop"
One thing you want to avoid is rotating the handles too far, which will cause your path segments to overlap and create loops. Here, I've rotated my handles all the way around so that the left handle is now on the right and the right handle is on the left, and notice what's happened. My path segments are now overlapping each other, creating a loop:
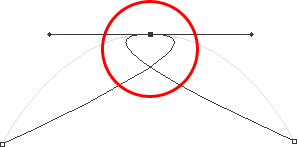
Rotating the direction handles too far causes the path segments to overlap, creating an unwanted loop in the path.
Loops can be caused by rotating the direction handles too far, as I've done above, but more often than not, they're caused by a handle being too long, making the curve too long and causing it to overlap with itself. If that happens, which it does sometimes as you're drawing a path, simply shorten the length of the direction handle. Most people end up creating a whole bunch of loops in their path when they first start working with the Pen Tool, so don't think you're the only one. No need to panic or become frustrated though. As I said, the problem is most likely being caused by a direction handle being too long, and all you need to do is shorten the handle to "un loop" the loop!
I'm going to press Ctrl+Alt+Z (Win) / Command+Option+Z (Mac) a few times once again to undo my changes and reset my path back to the nice smooth arc I started with. Now, what about rotating the direction handles independently of each other? As we learned on the previous page, to rotate the handles separately, instead of selecting them with "Ctrl/Command", we simply select them while holding down Alt (Win) / Option (Mac), which gives us temporary access to the Convert Point Tool. Click on the end of a handle to select it, then drag it with your mouse to rotate it and this time, the other handle will stay in place, breaking the connection between them.
Here, I've selected the handle on the right while holding "Alt/Option" and then rotated it down and to the left. Notice how once again, the angle of the path segment on the right changes to match the new direction of the handle, and this time, the handle on the left, along with the path segment on the left, both stay in place. My path now looks a bit like a shark fin:
Hold down "Alt" (Win) / "Option" (Mac) to temporarily access the "Convert Point Tool", then click on the end of a direction handle to select it and rotate it independently of the other handle.
Moving An Anchor Point
One thing we haven't looked at yet is how to move an anchor point. If you recall, I mentioned on the previous page that the Pen Tool is extremely forgiving, and one of the reasons for it, besides being able to rotate and resize our direction handles after we've created them, is that we can easily move anchor points from one spot to another if we need to. As we've already learned, anchor points anchor a path into place. The anchor points themselves, however, are not anchored into place. You can move an anchor point anywhere, anytime, and any path segments that are connected to it will move and adjust right along with it.
To move an anchor point, hold down Ctrl (Win) / Command (Mac) to temporarily access the Direct Selection Tool as we've already been doing, then simply click on the anchor point to select it and drag it to its new location with your mouse. Any path segments connected to it will move with it to the new location. Here, I've dragged my middle anchor point down a bit from its original location (again, the faint path marks the original location for comparison). Notice how the path itself has changed shape to adjust to the new location of the anchor point:
Hold down "Ctrl" (Win) / "Command" (Mac) and click on an anchor point to select it, then drag it to a new location. Any path segments connected to the point will move with it, changing shape as needed.
Normally, when outlining an object with a path to select it using the Pen Tool, you won't need to move to an anchor point quite as far as what I've done above, but it's very common to go back around your path after you've created it and nudge a few anchor points here and there to fine-tune the path. Once you've selected an anchor point, you can nudge it up, down, left or right using the arrow keys on your keyboard.
Combining Straight Paths With Curves
What if I didn't want both of my path segments to be curves? What if what I needed was for the first path segment to be curved, but the second one needed to be straight? Let's see how to do that. I'm going to delete my existing path and start over again. First, I'll click to add an anchor point to start things off. Then, just as before, I'll click to add a second anchor point up and to the right of my initial point, and this time, I'll drag out direction handles, which will create a curved path connecting the two points, giving me exactly what I had way up at the start of this page:
Click once to add an anchor point, then click to add a second anchor point and drag out direction handles to create a curve.
I now have my initial curve, but I want my next path segment to be straight. If I was to simply click somewhere to add another anchor point right now, I would get another curve because I have that direction handle extending out from the right side of the last anchor point I added. What I need to do is get rid of that one direction handle. Without a direction handle controlling the angle and length of a curve, we get a straight line.
To remove the handle, leaving only the handle on the left of the anchor point, all I need to do is hold down Alt (Win) / Option (Mac), which will again temporarily switch me to the Convert Point Tool, and then I just click directly on the anchor point. When I do, the direction handle on the right disappears, leaving only the one on the left:
Hold down "Alt" (Win) / "Option" (Mac) and click directly on the anchor point to remove the direction handle on the right, leaving only the one on the left.
Now, with the direction handle gone, if I click to add a new anchor point, I get a straight path segment between the two points :
With the direction handle on the right now gone, clicking to add a new anchor point adds a straight path segment between the two points.
I now have a curved path segment on the left and a straight one on the right! What if I wanted the exact opposite? Suppose I needed to start with a straight path segment and then follow it with a curve? To do that, first I'll start by clicking to add an initial anchor point. Then, since I want a straight path segment, all I need to do is click somewhere else to add a second anchor point, and I automatically get a straight path connecting the two points:
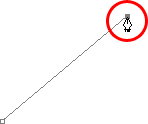
Click with the Pen Tool to add an initial anchor point, then click again somewhere else to add a second anchor point and create a straight path segment between them.
I'm going to keep my mouse button held down after clicking to add my second anchor point because I want my next path segment to be curved, and we know that in order to create a curve, we need a direction handle. To add a handle extending out from the right of my anchor point, I'm going to hold down Alt (Win) / Option (Mac), and with my mouse button still down, I'm simply going to to drag to the right of the anchor point. As I do, a direction handle will drag out along with it:
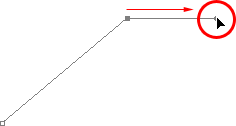
Hold down "Alt" (Win) / "Option" (Mac) and drag out a direction handle on the right of the anchor point.
Notice that the direction handle extended only from the right of the anchor point, not from both sides, leaving my straight path segment on the left in place. And now that I have my direction handle on the right, all I need to do to create my curve is click to add a third point:
Click to add a third anchor point, which creates a curved path segment between the previous anchor point and the new one.
And there we go! I now have a straight path segment on the left, followed by a curved segment on the right. Of course, most paths you draw are going to consist of more than just three anchor points. Let's say I wanted to continue this path, moving in the same general direction towards the right, and I want my next path segment to be curved as well. Just as I did a moment ago, I would leave my mouse button held down after clicking to add my third point. I would hold down Alt (Win) / Option (Mac) and I would drag out another direction handle. So far, we've only been dragging handles out towards the right, but what you really want to do is drag your handles out in the general direction you want the curve to follow. I want to create a curve that goes up and to the right, so I'm going to drag out a small handle in that same general direction:
Drag out your direction handles in the general direction of the curve.
Trinkgeld! A good practice to get into is to keep your direction handles small when first dragging them out, since you never really know how long or at what exact angle they need to be until the actual curve appears, and the curve doesn't appear until you've added both of its anchor points. Once you've added both points and the curve appears, you can easily go back and make any adjustments you need to the handles. You may even want to wait until you've drawn the entire path before worrying about adjusting the handles.
With my direction handle created, I'm going to click to add a fourth anchor point, and I'm going to drag out direction handles from it as well:
Adding a fourth anchor point along with direction handles extending from it.
I now have a third segment added to my path, this one being a curve. Notice that this curve actually has two direction handles controlling it, one extending from the right of my third anchor point and one extending from the left of my fourth point:

The third path segment now has two direction handles, one on either end, working together to control the curve.
The overall shape of this curve is now being controlled by the length and direction of both of these handles. Watch what happens to the curve when I move the handles. I'll drag the bottom handle down and to the right, and I'll drag the top handle up and to the left. I'll also drag both of these handles longer. The faint curve is the original for comparison:
Changing the direction and/or length of either handle changes the overall shape of the curve. After rotating and lengthening both handles, the curve now appears in an "S" shape.
The curve is now a bit "S" shaped, and that's because the bottom handle is controlling the angle and length of the curve as it flows out from the third anchor point, while the top handle is controlling the angle and length of the curve as it flows into the fourth point. Changing the length and/or direction of either handle will change the overall shape of the curve.
I'm going to press Ctrl+Alt+Z (Win) / Command+Option+Z (Mac) a couple of times to undo the changes I made, so the curve is once again in a simple arc shape as it was a moment ago, and I think I'll finish off this path with another straight segment, which means I'll need to remove that direction handle extending out from the right side of the fourth anchor point. We've already learned how to do that, by holding down Alt (Win) / Option (Mac) and clicking directly on the anchor point itself:
Hold down "Alt" (Win) / "Option" (Mac) and click directly on the anchor point to remove the direction handle on the right.
With the direction handle gone, all I need to do now to add a straight path segment is click to add another anchor point:
The direction handle on the right is now gone, so we can add a straight path segment simply by clicking to add another anchor point.
We could continue this path for as long as we wanted, adding more straight segments and curves, but I think we'll stop here because we've pretty much covered everything we need to know about drawing paths with the Pen Tool at this point. That was a lot of information to take in, especially if this is your first time learning about paths. As I mentioned at the beginning, you won't become a Pen Master simply by reading through this tutorial, just as you won't learn how to ride a bike, or drive a car, learn to swim, or play the piano simply by reading about it. But hopefully you have some sense at this point of how to draw paths with the Pen Tool, how to draw straight path segments, how to draw curves by dragging out direction handles, how to change the length and angle of the curve by rotating and resizing the handles, and how to combine straight and curved segments in a path.
To finish off our look at making selections with the Pen Tool, let's see a practical example of how to select an object with curves.
Here, we have a photo of a couple of dolphins leaping out of the water. Definitely a couple of very curvy creatures:

A photo of two dolphins jumping out of the water.
Let's say we want to select these dolphins so we can use them for a design or a collage, or whatever the case may be. If you were to try selecting them with the Lasso Tool, which is most likely what you would end up using if you didn't know how to use the Pen Tool, not only would you have a tough time, you'd have an even tougher time trying to convince yourself that you were happy with the results when you were done. The reason is because the Lasso Tool simply isn't capable of making curved selections very well. The biggest problem with it, besides being a pixel-based selection tool, is that it relies on you having a steady enough hand to move it smoothly around the curves. Even if you don't suffer from a caffeine addiction, you could drive yourself crazy trying to draw a perfectly smooth curve with your mouse, or even with a pen tablet, and when you've finally given up, you'll still be left with a selection full of rough, jagged edges that just scream "amateur!". No one likes to be called an amateur, especially when there's no need for it thanks to the Pen Tool!
Examine The Object First
Whenever you're about to select something with the Pen Tool, before you begin, take a moment to examine the object carefully to get a sense of where you're going to need to place your anchor points. Forget about all the details in the object and focus only on its shape. Where are the areas where the shape changes direction? Which parts of the shape are straight? Which parts are curved? If there's a curve, is it a smooth, continuous arc or does the angle change at a spot along the curve? Visualize in your mind where you're going to need to place your anchor points, because when you place one, you always want to be thinking about the next one and what the path segment between the two points needs to look like.
A Tool Of Elegance
One more thing to keep in mind is that the Pen Tool is meant to be a tool of elegance . It's not a nail gun or a staple gun. You don't want to just go clicking around your shape adding anchor points all "willy nilly" (that's a technical term). When using it to draw curves, you want those curves to be nice and smooth, otherwise we might as well just stick with the Lasso Tool. To keep the curves flowing smoothly, we need to limit the number of anchor points we use to create them. That's why you want to take a moment to examine the object first and visualize where the anchor points need to be. If you can outline a large section of the shape using only one curve with an anchor point on either end, that's what you want to do, because that's what's going to give you the kind of results you're looking for. The kind of results that scream "definitely not an amateur!".
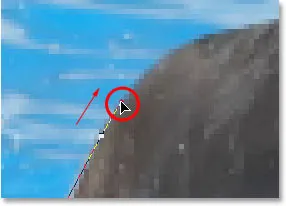
Let's select these dolphins. I'm going to start my path in the middle of the photo, at the spot where the side of the dolphin on the left overlaps the rear flipper of the dolphin on the right. There's no right or wrong place to begin a path. This is just where I've decided to start. The first part of that rear flipper is straight, so since I don't need a direction handle to create a straight path segment, I'm simply going to click once with my Pen Tool to add my first anchor point, which will serve as the starting point for my path:
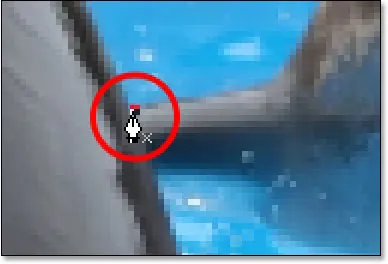
Adding the first anchor point.
As I mentioned earlier, you'll probably find it helpful to zoom in on your image as you're drawing your path. To scroll the image around on the screen as you're zoomed in, hold down the spacebar, which will switch you temporarily to the Hand Tool and allow you to move the image around on the screen by clicking and dragging it.
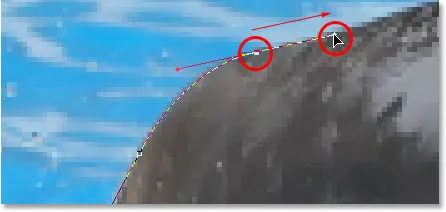
The top of that flipper actually has a slight curve to it as it approaches the dolphin's tail section, so for my second anchor point, I'm going to click at the point where the flipper and tail section meet, and I'm going to drag out short direction handles, dragging up and to the right in the direction that the tail section is moving. Notice that I've now created a slight curve along the flipper:
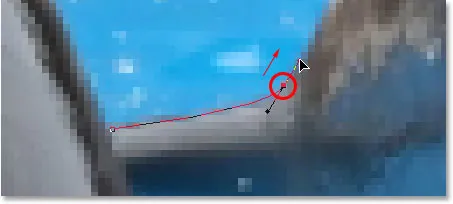
Adding the second anchor point and dragging out small direction handles to add a slight curve to the first path segment.
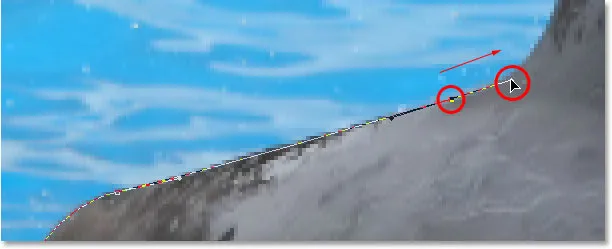
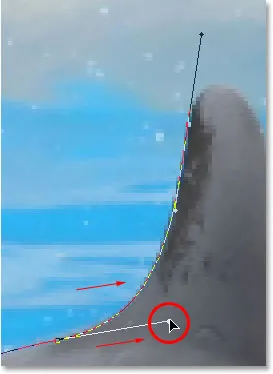
As I continue up along the tail, I can see that it stays straight for a short distance, followed by a curve to the right, so I'm going to click to add a third anchor point at the spot where the curve begins. This gives me a straight path segment between the previous point and the new one. I know there's a short direction handle extending out from the previous anchor point, which normally means that my new path segment will be a curve, not a straight section, but because the handle is so short and is also moving in the same direction as the path segment, there is no noticeable curve to it. Consider it a "mostly straight" path segment:
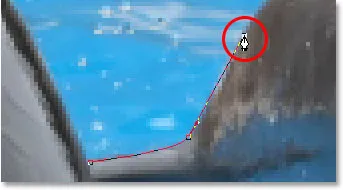
Clicking to add the third anchor point, creating a (mostly) straight path segment.
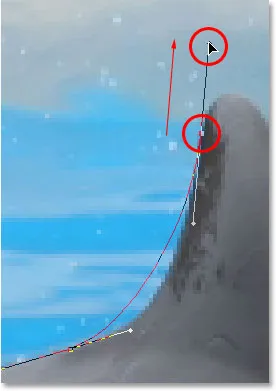
Continuing along, we come to the first real curve in our path. For this, I'm going to need to drag out a direction handle from the anchor point I just added, so I'm going to hold down Alt (Win) / Option (Mac), then drag out a handle in the general direction where I want the curve to flow as it starts. Notice how I'm only dragging out a handle from the one side of the anchor point, not both:
Hold "Alt" (Win) / "Option" (Mac) to drag out a direction handle from one side of an anchor point.
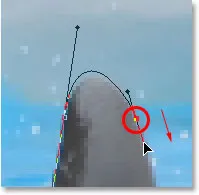
To add the curve, I'll click and drag at the spot where the curve ends, shaping the curve as I drag out the handles until it matches the curve of the dolphin's tail. If I needed to, I could also go back and change the length and direction of the handle at the start of the curve to fine-tune it, but in this case, I don't need to do that:
Adding an anchor point at the opposite end of the curve and dragging out direction handles from it, rotating and resizing them as needed until the curve matches the curve of the object.
The next area of the dolphin is pretty straight, right up until its back begins to merge with its dorsal fin, at which point there's another curve, so I'm going to click to add an anchor point just before the curve up the dorsal fin begins, which is going to give me another "mostly straight" path segment between the previous point and the new point. Then I'm going to once again hold down Alt (Win) / Option (Mac) and drag out a direction handle as I prepare for my next path segment which will be curved:
Click to add an anchor point, then hold down "Alt" (Win) / "Option" (Mac) and drag out a direction handle to prepare for the next path segment.
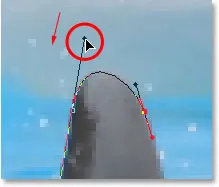
The left side of the dorsal fin consists mainly of one continuous curve upward until it gets near the very top, at which point the shape changes, so to create this curve, I'm going to click and drag at the point near the top where the curve will change direction. As we can see in the screenshot, this adds a curved path segment between the previous anchor point and the new one, but the curve is not yet following along the shape of the fin. It's going to need some fine-tuning:
Adding a curve along the left side of the dorsal fin. The curve still needs some adjusting.
To adjust the curve, I'm simply going to hold down the Ctrl (Win) / Command (Mac) key, which gives me temporary access to the Direct Selection Tool, and I'm going to drag the handle extending out from the bottom anchor point towards the right to lengthen it, which is going to pull the angle of the curve in towards the right along with it, lining it up nicely with the curve of the fin. I've also rotated the top direction handles slightly in a clockwise direction just to be nit-picky, but the majority of the adjustment was done using the bottom direction handle:
Adjust the curve by adjusting its direction handles.
To add a curve around the top of the fin, I'll click and drag on the opposite side of it to add another anchor point with short direction handles. Notice though that we run into a bit of a problem. The direction handle on the left side of the curve is too long and it's pulling the curve away from the top of the fin:
The direction handle on the left of the curve is too long, resulting in the curve not following the shape of the fin.
To fix that, all I need to do is once again hold down Ctrl (Win) / Command (Mac), then click on the end of the handle to select it and drag it shorter until the curve is the proper shape:
Shortening the length of the direction handle to adjust the shape of the curve.
Let's finish creating our path around the dorsal fin. The remainder of the fin is basically a straight line, so I'm going to click at the base of the fin to add another anchor point which adds the straight path segment, completing our path around the fin:
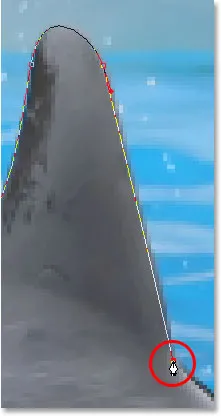
Adding an anchor point at the base of the fin to finish drawing the path around it.
Since you and I would both be here all day if I was to continue commenting on every anchor point, direction handle and path segment as we make our way slowly around the dolphins, and since we've covered everything we need to know at this point, I'm going to go ahead and draw the rest of the path, outlining both dolphins:

Both dolphins are now outlined by the path.
The dolphins have now been outlined with the path, and if we look at the Paths palette, we can see that sure enough, we have a path in the shape of the dolphins:
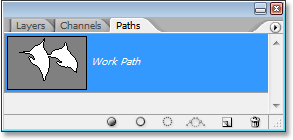
Photoshop's Paths palette showing the outline of the dolphins in the preview thumbnail.
As we've learned, Photoshop automatically names the path "Work Path", which means it's temporary and will be replaced if we start a new path. If you wanted to save it, you would need to double-click on the name "Work Path" and rename it to something else, like "Dolphins" in this case. I'm not going to worry about that, since I have no need to save it. All I want to do at this point is convert my path into a selection, and since I'm already in the Paths palette, I'll do that by clicking on the Load path as selection icon at the bottom of the palette:
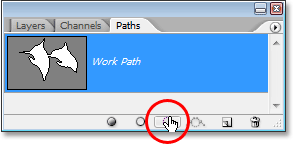
Clicking the "Load path as selection" icon at the bottom of the Paths palette.
I could also have used the keyboard shortcut Ctrl+Enter (Win) / Command+Return (Mac) . Either way converts my path into a selection, and if I look at my photo, I can see that my path has indeed become a selection around the dolphins:

The path around the dolphins has now been converted into a selection.
Wohin als nächstes gehen …
Und da haben wir es! The dolphins are now selected and ready for whatever plans we have for them. And with that, we wrap up our look at drawing paths and making selections with the Pen Tool in Photoshop! Weitere Informationen zu den Auswahlwerkzeugen von Photoshop finden Sie unter So treffen Sie eine Auswahl in Photoshop-Serien. Weitere Photoshop-Themen finden Sie in unserem Abschnitt "Photoshop-Grundlagen".